Introduction 00:00
In this lesson we are going to learn how to create holographic material that is often used in Sci-Fi movies such as Star Wars:

Most of the effect is done in the fragment shader, but there is also a glitch effect on the vertex shader, making the vertices go a little crazy in waves.
We are going to rely quite a lot on the Fresnel effect that enables visual variations according to the angle between the face and the camera angle. More about this in due time.
Setup 00:28
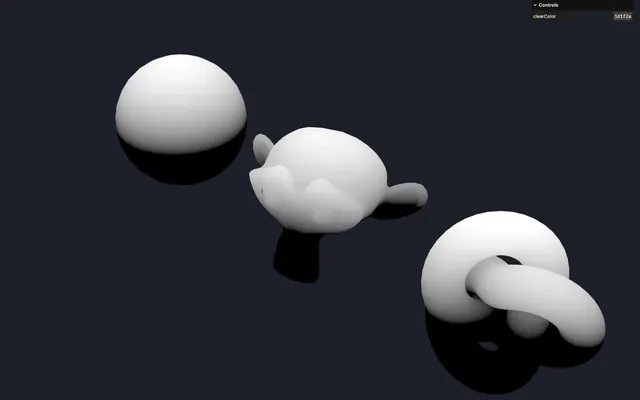
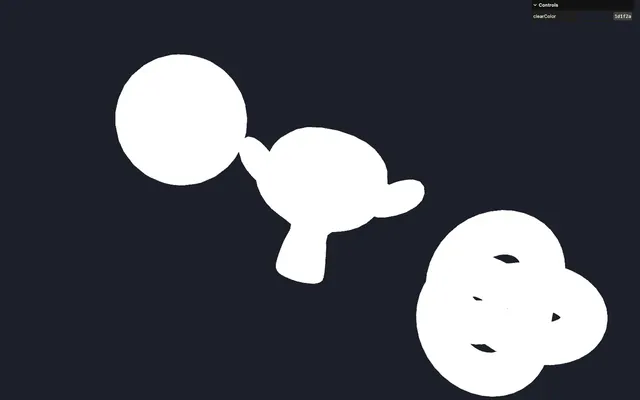
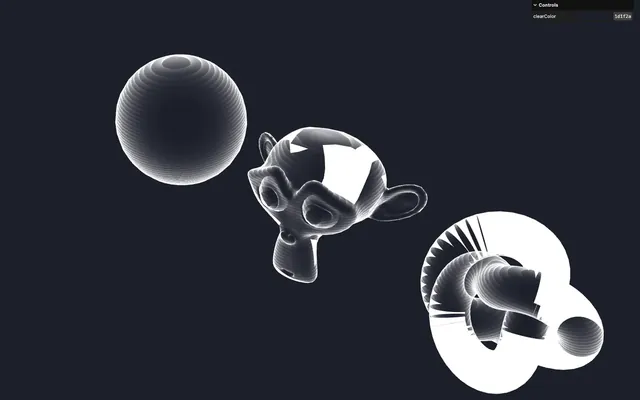
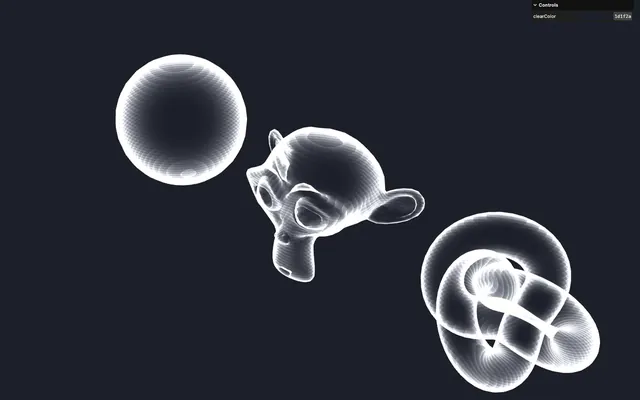
The starter already contains the following:
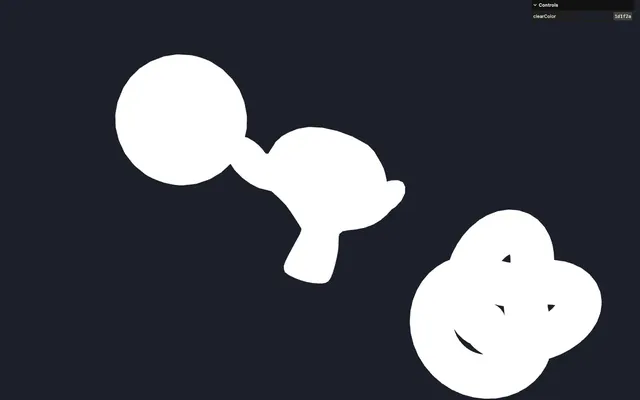
- 3 rotating objects: a sphere, Suzanne and a torus knot
- A single instance of MeshBasicMaterial for all 3 objects
- An instance of
lil-guiwith theclearColoralready set if you want to change the background color - An instance of
Clockfrom which we get theelapsedTimein thetickfunction - The
vite-plugin-glsldependency to handle GLSL files OrbitControlsto rotate around
Material 01:37
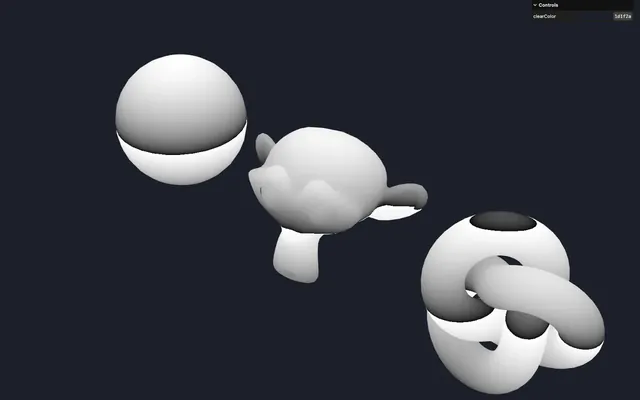
Let’s start by changing the MeshBasicMaterial to ShaderMaterial:
const material = new THREE.ShaderMaterial()

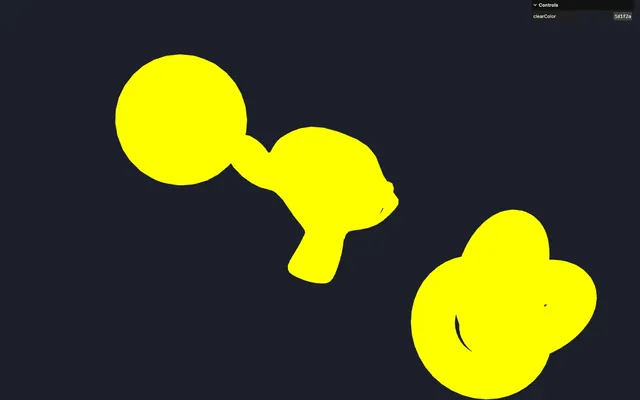
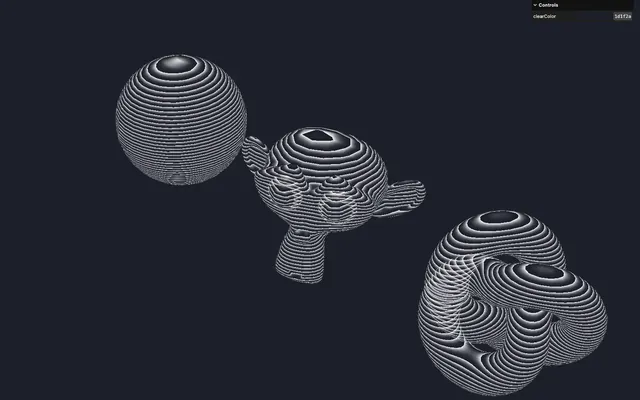
The objects become red because of the default vertex and fragment shaders provided by Three.js.
Create the shader files
In src/, create a shaders/ folder and, in that src/shaders/ folder, create a holographic/ folder.
In the src/shaders/holographic/ folder, create a vertex.glsl file and add the minimum program we need to position the vertices:
void main()
{
    // Position
    vec4 modelPosition = modelMatrix * vec4(position, 1.0);

    // Final position
    gl_Position = projectionMatrix * viewMatrix * modelPosition;
}
We’ve separated the modelPosition because we need to work on it before applying the other matrices. It’ll make more sense shortly.
Still in the src/shaders/holographic/ folder, create a fragment.glsl file and add the minimum program we need to color the fragments in yellow:
void main()
{
    // Final color
    gl_FragColor = vec4(1.0, 1.0, 0.0, 1.0);
}
To that fragment shader, we are going to add two #include at the very end of the main() function:
void main()
{
    // Final color
    gl_FragColor = vec4(1.0, 1.0, 0.0, 1.0);
    #include <tonemapping_fragment>
    #include <colorspace_fragment>
}
Those are instructions for Three.js that will inject corresponding chunks to handle tone mapping, and color spacing as explained in the previous lessons.
Use the shader files
Back in src/script.js, import both shaders as holographicVertexShader and holographicFragmentShader:
import holographicVertexShader from './shaders/holographic/vertex.glsl'
import holographicFragmentShader from './shaders/holographic/fragment.glsl'
Send those shaders to the ShaderMaterial using the vertexShader and fragmentShader properties:
const material = new THREE.ShaderMaterial({
    vertexShader: holographicVertexShader,
    fragmentShader: holographicFragmentShader
})
Stripes 06:47
Let’s start with the fragment shader.
Pattern
We are going to draw a striped pattern. We want to create small gradients that keep on repeating as we go up.
The technique is very similar to one of the very first patterns from the Shader Patterns lesson:
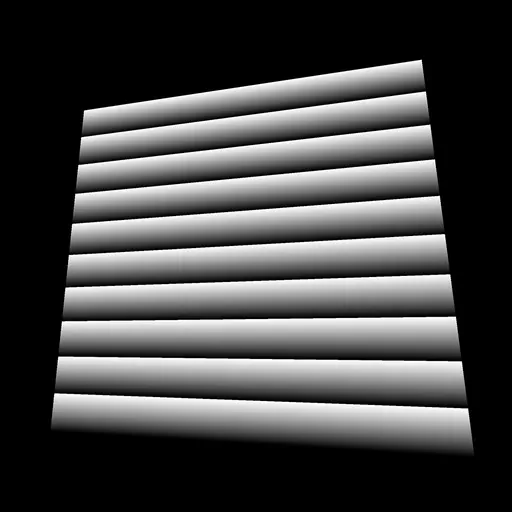
But instead of relying on the UV coordinates, we are going to use the modelPosition.
In vertex.glsl, create a vec3 vPosition varying and assign the modelPosition to it:
varying vec3 vPosition;

void main()
{
    // Position
    vec4 modelPosition = modelMatrix * vec4(position, 1.0);

    // Final position
    gl_Position = projectionMatrix * viewMatrix * modelPosition;

    // Varyings
    vPosition = modelPosition.xyz;
}
Note that vPosition is a vec3 while modelPosition is a vec4 which is why we extract only the xyz (called swizzling).
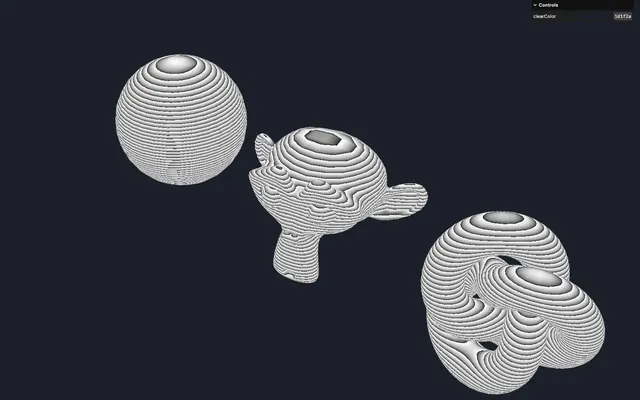
In fragment.glsl, retrieve the vPosition and send it to the gl_FragColor to make sure it’s working:
varying vec3 vPosition;

void main()
{
    // Final color
    gl_FragColor = vec4(vPosition, 1.0);
    // ...
}
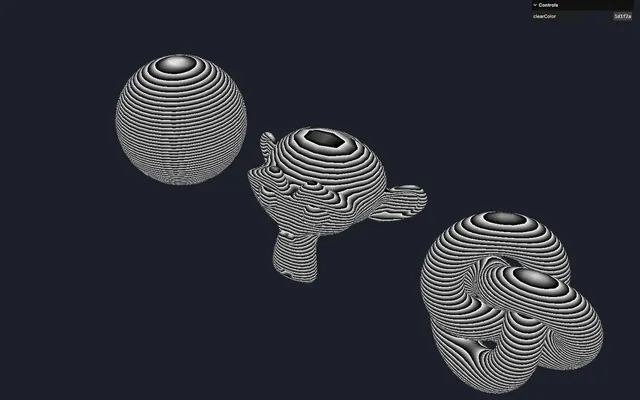
Create a float stripes variable and assign it vPosition.y. Then send it to the first 3 values of the gl_FragColor:
void main()
{
    // Stripes
    float stripes = vPosition.y;

    // Final color
    gl_FragColor = vec4(stripes, stripes, stripes, 1.0);
    // ...
}
We get one gradient.
We now want that gradient to get back to 0.0 when reaching 1.0 so that it repeats itself. We can achieve that using the mod function:
void main()
{
    // Stripes
    float stripes = mod(vPosition.y, 1.0);

    // ...
}
The gradient seems to repeat itself, but we can only see two or three repetitions.
Increase the frequency of the gradients by multiplying vPosition.y by 20.0:
void main()
{
    // Stripes
    float stripes = mod(vPosition.y * 20.0, 1.0);

    // ...
}
If you search for the modulo definition you might be overwhelmed, especially if mathematics isn’t your thing. But I like to think of it as: You send a value as a the first parameter and when that value reaches the second parameter it goes back to 0:
You might have noticed that the gradient pattern seems to be the same in space, meaning that it doesn’t rotate with the objects, which is exactly what we wanted.
Out of curiosity, in vertex.glsl, send position instead of modelPosition to vPosition:
void main()
{
    // ...
    vPosition = position.xyz;
}
The pattern now follows the object transformation. This could be the style you’d want, but I prefer to have the “world space” pattern we had before.
Add modelPosition.xyz back in:
void main()
{
    // ...
    vPosition = modelPosition.xyz;
}
Back to fragment.glsl: we want the gradient to be sharper. We still want the value to go from 0.0 to 1.0 but to take longer to take off, slowly increase, and then reach 1.0 fast. And we already know how to do that. We can use a power:
Note that using a power to crush a value like this only works because that value goes from 0 to 1.
Apply a pow on stripes and set the second parameter to 3.0:
void main()
{
    // Stripes
    float stripes = mod(vPosition.y * 20.0, 1.0);
    stripes = pow(stripes, 3.0);

    // ...
}
Animation
Finally, we want the pattern to move up in order to add some life and animation to static objects.
In script.js, add a uTime uniform to the material and assign an instance of the Uniform class to it, which is set to 0:
const material = new THREE.ShaderMaterial({
    // ...
    uniforms:
    {
        uTime: new THREE.Uniform(0),
    },
    // ...
})
In the tick function, assign the elapsedTime to the uniform’s value:
const tick = () =>
{
    const elapsedTime = clock.getElapsedTime()

    // Update material
    material.uniforms.uTime.value = elapsedTime

    // ...
}
Back in fragment.glsl, retrieve the uTime uniform, and subtract it from the vPosition.y:
uniform float uTime;

// ...

void main()
{
    // Stripes
    float stripes = mod((vPosition.y - uTime) * 20.0, 1.0);
    // ...
}
Slow it down by multiplying it by 0.02:
uniform float uTime;
// ...

void main()
{
    // Stripes
    float stripes = mod((vPosition.y - uTime * 0.02) * 20.0, 1.0);
    // ...
}
You can deactivate the rotation of the objects if you want to appreciate the result more clearly.
As you can see, we are only using the y property of vPosition and we could have sent only that value as a varying instead of a vec3, but let’s keep it like this because we’re gonna need the whole vec3 shortly.
Alpha
Until now, we have been using the stripes as the color. Let’s try it on the alpha of gl_FragColor and set the rest to 1.0:
void main()
{
    // ...
    gl_FragColor = vec4(1.0, 1.0, 1.0, stripes);
    // ...
}
As always we need to set transparent to true on the material to support transparency:
const material = new THREE.ShaderMaterial({
    // ...
    transparent: true
})
Fresnel 19:59
The pattern is looking good but a bit too regular. Most of the time, holograms are represented with their outside looking brighter than the inside.
We can do that using the normal and the view angle.
We want a value to be 1.0 when the view angle is perpendicular to normal and 0.0 when the view angle is aligned with the normal:
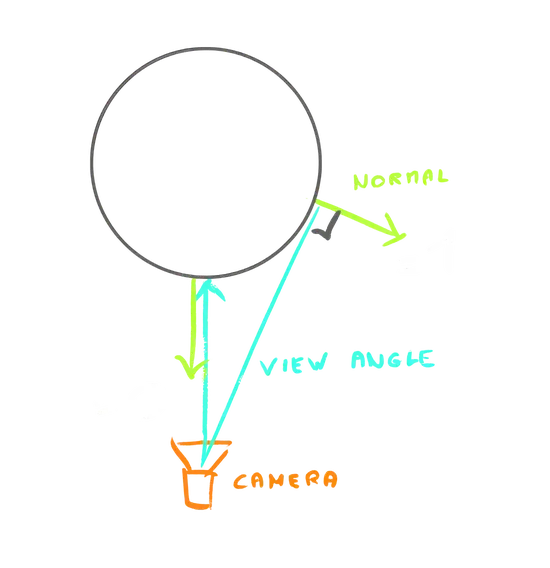
This effect is called “Fresnel”.
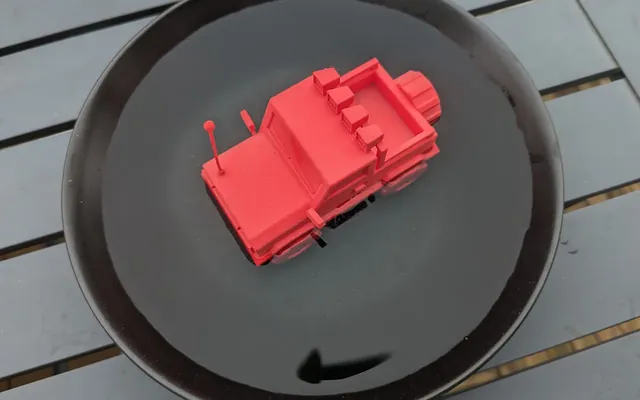
Fresnel is used a lot even though we barely notice it. It’s used to create cool effects like we are doing right now, but it’s also used for physically accurate rendering when handling reflection because a surface is more reflective when seen at an narrow angle. You can witness that when watching the surface of a lake. When seen from above, you can see the rocks and fishes in the water. But when seen at a narrow angle, you can’t see what’s in the water because of the reflection.
Here is an example with photos I took a few seconds apart.
When seen at a narrow angle, the sky reflection is bright and we can hardly see the bottom of the plate:

When seen at a perpendicular angle, we can see the bottom of the plate and we can even notice small scratches:
If you are curious, here are some articles tackling the topic in depth:
- https://www.racoon-artworks.de/cgbasics/fresnel.php
- https://www.dorian-iten.com/fresnel/
- https://shanesimmsart.wordpress.com/2022/03/29/fresnel-reflection/
By the way, Three.js materials like the MeshStandardMaterial are using Fresnel to mimic realistic materials.
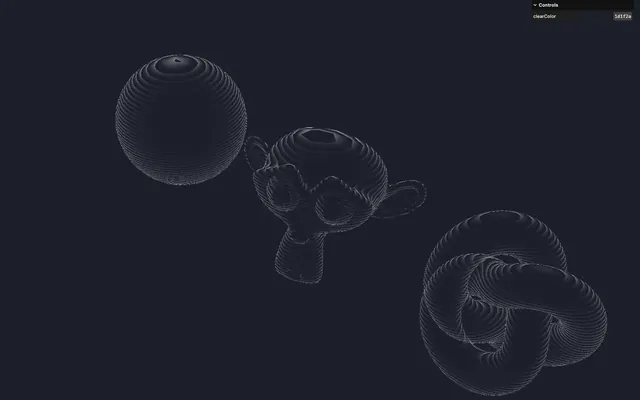
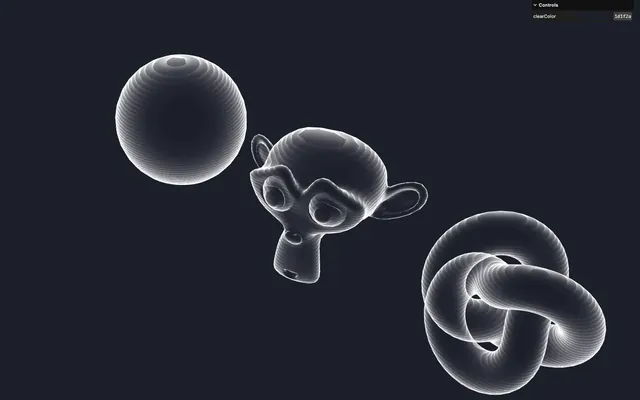
Normal
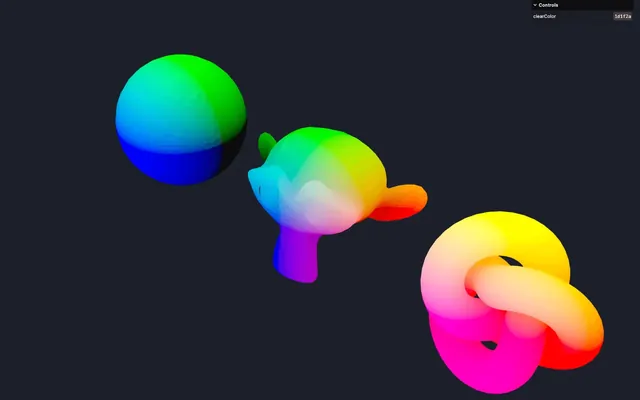
We are going to calculate the Fresnel in the fragment shader to avoid visual artifacts. First, let’s send the normal to the fragment as a varying.
In vertex.glsl, create a vec3 vNormal varying and assign it the normal:
// ...
varying vec3 vNormal;

void main()
{
    // ...
    vNormal = normal;
}
In fragment.glsl, retrieve the vNormal varying and send it to the gl_FragColor with 1.0 on the alpha, just to have a look at it:
// ...
varying vec3 vNormal;

void main()
{
    // ...
    gl_FragColor = vec4(vNormal, 1.0);
    // ...
}
It looks fine, but we’ve actually made two mistakes. Since we can’t notice those mistakes yet, let’s continue for now and we will circle back to it in due time.
Dot product
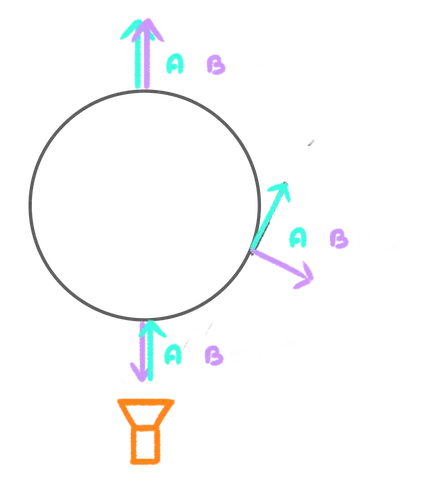
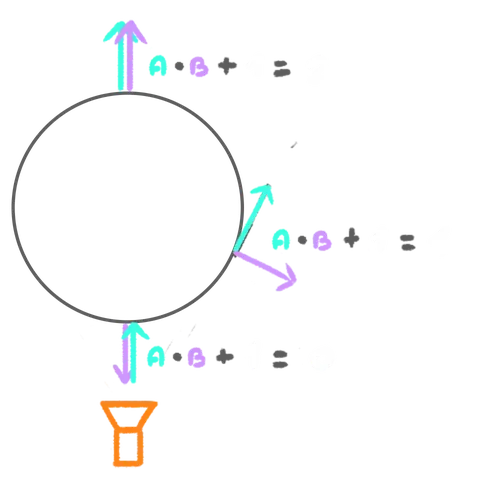
Remember that we want to know how perpendicular are the normal and the view vector. But what is the view vector exactly?
It’s a 3D vector that goes from the camera position to the fragment position:
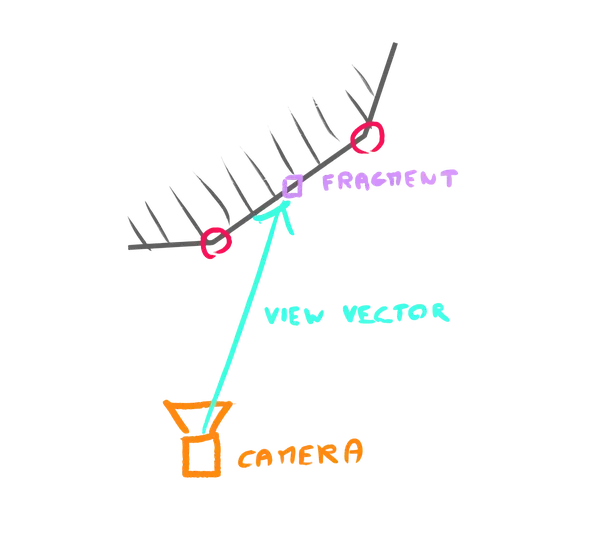
The good news is that we already have the 3D position of the fragment thanks to vPosition and we already have access to the camera position thanks to the built-in Three.js uniforms and more precisely cameraPosition.
To get the vector between two vectors, we can simply subtract the origin from the destination:
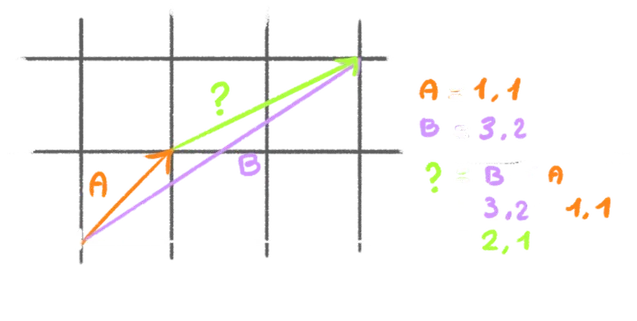
In our case, the destination is vPosition and the origin is cameraPosition.
Save the result as viewDirection:
void main()
{
    // ...

    // Fresnel
    vec3 viewDirection = vPosition - cameraPosition;

    // ...
}
We are going to compare viewDirection with vNormal using a special function that requires the vectors to have the same length, which is not the case right now.
vNormal should have a length of 1 but viewDirection can vary a lot. To force it to have a length of 1, we can use normalize:
void main()
{
// ...
// Fresnel
vec3 viewDirection = normalize(vPosition - cameraPosition);
// ...
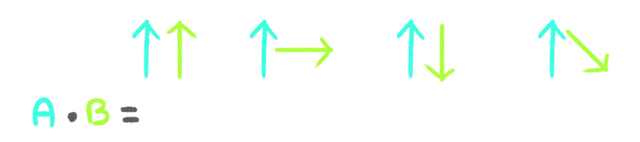
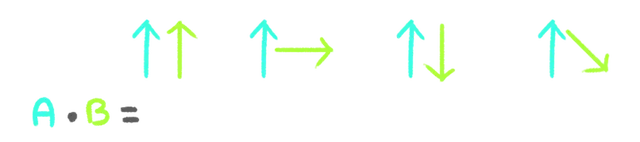
}It’s finally time to compare viewDirection with vNormal and we are going to use a dot product.
Let me explain what the dot product does in simple words:
Considering two vectors of the same length:
- If they are in the same direction, we get
1 - If they they are perpendicular, we get
0 - If they are opposite, we get
-1 - In between values are interpolated
Create a float fresnel variable, and assign the result of a dot of viewDirection and vNormal to it. Send the result to gl_FragColor:
void main()
{
    // ...
    vec3 viewDirection = normalize(vPosition - cameraPosition);
    float fresnel = dot(viewDirection, vNormal);

    // Final color
    gl_FragColor = vec4(1.0, 1.0, 1.0, fresnel);
    // ...
}
Not the expected result. We have a few things to fix.
Fix the normal orientation
First of all, the Fresnel value shouldn’t change with the object rotation. If you watch the sphere, you can see that the Fresnel rotates with the sphere although it should stay the same, relative to the camera.
This is because we are using the base normal attribute which doesn’t take into account the transformation of the object.
And we already know how to retrieve and apply the transformation of the object. We can use the modelMatrix as we did for the position.
In vertex.glsl, create a modelNormal, and apply the modelMatrix to it, but this time, set the fourth value to 0.0 instead of 1.0:
void main()
{
    // ...

    // Model normal
    vec4 modelNormal = modelMatrix * vec4(normal, 0.0);

    // ...
}
When the fourth value is set to 1.0, it means that our vector is “homogeneous” and all 3 transformations (translation, rotation, scale) implied by the modelMatrix will be applied, which is perfect in the case of a position.
When the fourth value is set to 0.0, it means that our vector is not homogeneous and the translation won’t be applied, which is ideal in the case of a normal, because the normal is not a position, it’s a direction.
To understand this, imagine that we apply a translation on a simple geometry and focus on one vertex and one normal:
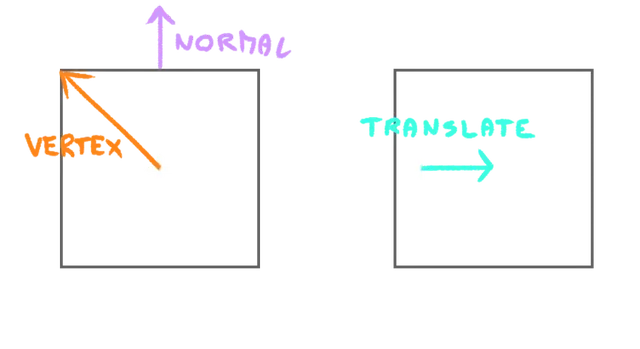
In the case of the vertex, we want to apply the translation so that it moves to the right:
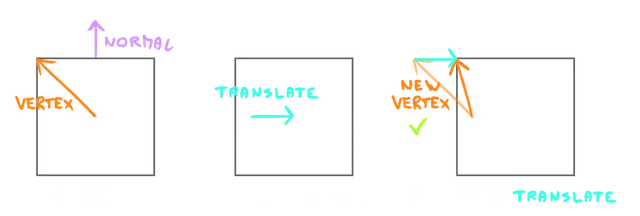
If we apply that same translation to the normal, that normal would end up lining to the right too, which is wrong:
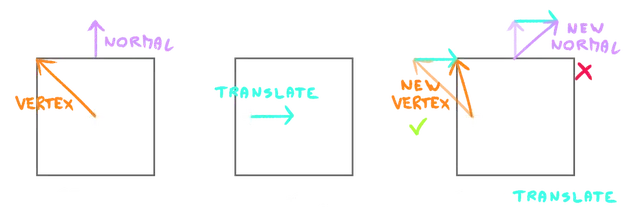
But if we set the fourth value of the vec4 to 0.0 before applying the modelMatrix, only the rotation is applied. In this case, since there is only a translation, the normal orientation is preserved:
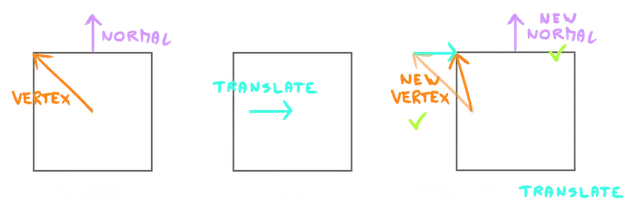
As for the scale, yes it’ll be applied, but it’s not an issue because we are going to normalize the varying again in the fragment shader a bit later.
Now we can assign the xyz of the modelNormal to the vNormal:
void main()
{
    // ...
    vNormal = modelNormal.xyz;
}
Fix the range
You might think that you’ve made a mistake because there is nothing on screen anymore, but watch closely and you’ll notice the borders of the objects.
Remember what we said about the output of dot:
- If they are in the same direction, we get
1 - If they they are perpendicular, we get
0 - If they are opposites, we get
-1
We can’t see anything because the normal vector is oriented toward the camera:
There are multiple ways of fixing that, but personally, I like to add 1.0 to the output of dot so that the value goes from 0.0 (opposite) to 1.0 (perpendicular) to 2.0 (same direction):
void main()
{
    // ...
    float fresnel = dot(viewDirection, vNormal) + 1.0;

    // ...
}
And that’s the Fresnel we wanted to see.
Normalize the normal?
But we aren’t done fixing it. If you watch the sphere, you might notice a grid pattern on the surface. This might not be visible on the video because of the compression but you can test it on your computer.
It’s barely visible, but it’s there.
This is due to the normal length not being 1.0. Isn’t it weird? Even though we’ve applied the modelMatrix to the normal before sending it to the fragment as a varying, its length should be 1.0.
The reason is that, between vertices, varying are being interpolated. And if you interpolate two normalized vectors, you don’t necessarily end up with a vector of length 1:

Fortunately, we can fix that easily by normalizing it again in the fragment shader.
At the beginning of the fragment shader, create a vec3 normal variable, assign a normalized version of the vNormal to it and send it to the dot instead of vNormal:
void main()
{
    // Normal
    vec3 normal = normalize(vNormal);

    // ...
    float fresnel = dot(viewDirection, normal) + 1.0;

    // ...
}
The grid artifact is gone.
Power
Let’s apply a power to the fresnel to make it sharper using the pow function:
void main()
{
    // ...
    float fresnel = dot(viewDirection, normal) + 1.0;
    fresnel = pow(fresnel, 2.0);

    // ...
}
Combine with the stripes
It’s time to combine the stripes pattern with the fresnel.
To do that, we are going to create a new variable named holographic, which will be the final variable we use on the alpha of gl_FragColor and assign stripes to it, multiplied by fresnel:
void main()
{
    // ...

    // Holographic
    float holographic = stripes * fresnel;

    // Final color
    gl_FragColor = vec4(1.0, 1.0, 1.0, holographic);
    // ...
}
The combination looks good but it’s too dim, as we can barely see the objects.
We are going to add the fresnel on top of it and make it even stronger by multiplying it by 1.25:
void main()
{
    // ...

    // Holographic
    float holographic = stripes * fresnel;
    holographic += fresnel * 1.25;

    // ...
}
Back side 47:46
Real-life holograms (as we imagine them at least) should be transparent. We should be able to see the front side and the back side.
Let’s try to set side to DoubleSide in the material:
const material = new THREE.ShaderMaterial({
    // ...
    side: THREE.DoubleSide
})
This is not what we were going for.
First of all, if you remember what we did with the Fresnel, we added 1.0 to the dot resulting in values going from 1.0 to 2.0 in the back, which is why it looks so bright now:
To fix that, we are going to invert the normals, but only for the back side.
There is a built-in variable named gl_FrontFacing which is a boolean being true if the fragment we are drawing is facing the camera and false otherwise.
In fragment.glsl, right after normalizing the vNormal, test if it’s the back side by inverting gl_FrontFacing with !. Next, in the if statement, multiply normal by - 1.0 to invert it:
void main()
{
    // Normal
    vec3 normal = normalize(vNormal);
    if(!gl_FrontFacing)
        normal *= - 1.0;

    // ...
}
We end up with a better looking result, but there seem to be some glitches. This is due to the front side occluding the back side because it is currently writing on the depth buffer.
Set depthWrite to false on the material to stop rendering on the depth buffer:
const material = new THREE.ShaderMaterial({
    // ...
    depthWrite: false
})
And to go even further, since holograms are supposedly composed of light, we can change the blending to AdditiveBlending in the material:
const material = new THREE.ShaderMaterial({
    // ...
    blending: THREE.AdditiveBlending
})
Falloff 53:34
We are going to fade out the alpha on the edges.
To do that, we are going to use the same Fresnel, but remap it using a smoothstep so that the value is 1.0 near the edge, and drops down smoothly to 0.0 at the very edge:
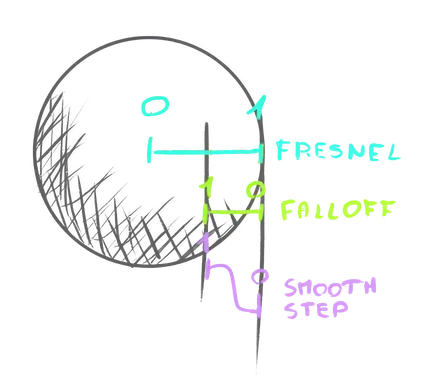
Create a float falloff variable after the Fresnel part and apply a smoothstep from 0.8 to 0.0 on the fresnel variable:
void main()
{
    // ...

    // Falloff
    float falloff = smoothstep(0.8, 0.0, fresnel);

    // ...
}
Multiply the holographic by falloff:
void main()
{
    // ...

    // Holographic
    float holographic = stripes * fresnel;
    holographic += fresnel * 1.25;
    holographic *= falloff;

    // ...
}
The 0.8 and 0.0 limits for the smoothstep might sound odd, but it’s because we’ve already applied a pow on fresnel and also because the AdditiveBlending is making the edges already quite bright since we see both faces.
It’s the kind of situation where you have to test various numbers until you are happy with the result.
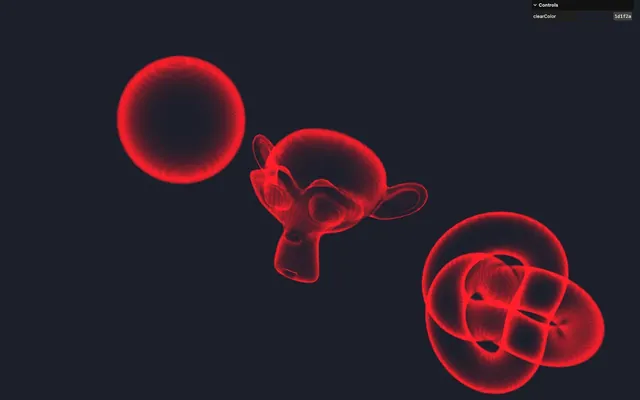
Color 55:54
Let’s change the color.
This time, we are going to use a uniform and make it tweakable.
In script.js, add a uColor uniform using a Color instance inside a Uniform instance and set the color to 'red':
const material = new THREE.ShaderMaterial({
    // ...
    uniforms:
    {
        // ...
        uColor: new THREE.Uniform(new THREE.Color('red'))
    },
    // ...
})
Be careful, it’s easy to make mistakes when nesting that many instances.
In fragment.glsl, retrieve the uColor uniform and set it on the first three values of the gl_FragColor:
uniform vec3 uColor;
// ...

void main()
{
    // ...
    gl_FragColor = vec4(uColor, holographic);
    // ...
}
In script.js, we want to tweak that color.
Tweaking the Color directly will result in color spacing issues. We need to create a “dummy” object as seen in previous lessons.
Before the material, create a materialParameters object with a color property set to '#70c1ff':
/**
 * Material
 */
const materialParameters = {}
materialParameters.color = '#70c1ff'

const material = new THREE.ShaderMaterial({
    // ...
})
Now create the corresponding tweak using the addColor() function on gui:
gui.addColor(materialParameters, 'color')First, chain an onChange() at the end of the addColor(), send it a function. Next, update the uColor uniform in that function:
gui
    .addColor(materialParameters, 'color')
    .onChange(() =>
    {
        material.uniforms.uColor.value.set(materialParameters.color)
    })
Send the materialParameters.color to the initial color of the uColor uniform instead of the 'red':
const material = new THREE.ShaderMaterial({
    // ...
    uniforms:
    {
        uColor: new THREE.Uniform(new THREE.Color(materialParameters.color)),
        // ...
    },
    // ...
})
Glitch effect 01:01:24
We are done with the fragment shader.
Now we want to create that glitch effect as if the hologram lens or whatever technical component was damaged, causing the image to jump a little.
Base effect
At first, we are going to make all the vertices glitch and then make the effect more sporadic.
First, we want the vertices to move randomly on the x and z axes. But “randomly” in GLSL isn’t that easy and we need to find some hacks in order to generate random values. These hacks are very well explained in this Book of Shaders article, which also contains the following random function:
float random (vec2 st) {
    return fract(sin(dot(st.xy,
                         vec2(12.9898,78.233)))*
        43758.5453123);
}
I’ve re-written that function like this:
float random2D(vec2 value)
{
    return fract(sin(dot(value.xy, vec2(12.9898,78.233))) * 43758.5453123);
}
The main idea is that we are creating a hardly predictable number and we extract the decimals using fract.
Note that in this case we are using a 2D random, meaning that we send a vec2 as the input and get a “random” float from 0.0 to 1.0. However, there are other types of random functions.
Let’s add that function before the main() in our vertex shader:
// ...

float random2D(vec2 value)
{
    return fract(sin(dot(value.xy, vec2(12.9898,78.233))) * 43758.5453123);
}

void main()
{
    // ...
}
We are going to update the modelPosition and start with the x.
Use modelPosition.xz as the parameter of random2D() and add the result to modelPosition.x:
void main()
{
    // ...

    // Glitch
    modelPosition.x += random2D(modelPosition.xz);

    // Final position
    // ...
}
We are using modelPosition.xz as the input so that we get different offsets for each vertex. Yet, if the model stops moving, the glitch will look static.
Comment the object rotations to see it:
const tick = () =>
{
    // ...

    // // Rotate objects
    // if(suzanne)
    // {
    //     suzanne.rotation.x = - elapsedTime * 0.1
    //     suzanne.rotation.y = elapsedTime * 0.2
    // }

    // sphere.rotation.x = - elapsedTime * 0.1
    // sphere.rotation.y = elapsedTime * 0.2

    // torusKnot.rotation.x = - elapsedTime * 0.1
    // torusKnot.rotation.y = elapsedTime * 0.2

    // ...
}
What we can do to fix that, is retrieve the uTime uniform and add it to the modelPosition.xz:
uniform float uTime;

// ...

void main()
{
    // ...
    modelPosition.x += random2D(modelPosition.xz + uTime);

    // ...
}
Vertices are glitching even though the model isn’t moving.
Uncomment the object rotations:
const tick = () =>
{
    // ...

    // Rotate objects
    if(suzanne)
    {
        suzanne.rotation.x = - elapsedTime * 0.1
        suzanne.rotation.y = elapsedTime * 0.2
    }

    sphere.rotation.x = - elapsedTime * 0.1
    sphere.rotation.y = elapsedTime * 0.2

    torusKnot.rotation.x = - elapsedTime * 0.1
    torusKnot.rotation.y = elapsedTime * 0.2

    // ...
}
We can now do the same for the modelPosition.z and use the modelPosition.zx as the input to achieve a different result:
uniform float uTime;

// ...

void main()
{
    // ...
    modelPosition.x += random2D(modelPosition.xz + uTime);
    modelPosition.z += random2D(modelPosition.zx + uTime);

    // ...
}
You might have noticed that the objects, although very fuzzy, aren’t at their initial position anymore:
It’s because random2D() returns a value from 0.0 to 1.0 making it only positive which results in the vertices going in the same general direction.
We can fix that by subtracting 0.5 from both random2D(). This way, the value goes from-0.5 to +0.5:
uniform float uTime;

// ...

void main()
{
    // ...
    modelPosition.x += random2D(modelPosition.xz + uTime) - 0.5;
    modelPosition.z += random2D(modelPosition.zx + uTime) - 0.5;

    // ...
}
Variation in time and space
We now want that effect to look like waves going from the bottom to the top, sporadically.
To achieve this, we are going to create a glitchStrength variable and assign the result of the sin function to it, with uTime as its input.
void main()
{
    // ...
    float glitchStrength = sin(uTime);
    modelPosition.x += random2D(modelPosition.xz + uTime) - 0.5;
    modelPosition.z += random2D(modelPosition.zx + uTime) - 0.5;

    // ...
}
We now multiply the x and z by glitchStrength:
void main()
{
    // ...
    float glitchStrength = sin(uTime);
    modelPosition.x += (random2D(modelPosition.xz + uTime) - 0.5) * glitchStrength;
    modelPosition.z += (random2D(modelPosition.zx + uTime) - 0.5) * glitchStrength;

    // ...
}
We now have the whole effect being applied back and forth because of the sin().
Let’s lower the effect by multiplying glitchStrength by 0.25:
void main()
{
    // ...
    float glitchStrength = sin(uTime);
    glitchStrength *= 0.25;

    // ...
}
And now, to make the effect move from the bottom to the top, we are going to subtract modelPosition.y from uTime:
void main()
{
    // ...
    float glitchStrength = sin(uTime - modelPosition.y);

    // ...
}
It’s the same effect but offset in time according to the modelPosition.y.
Since we are using a sin(), the value goes from -1 to +1 like waves, making it active most of the time:
We want the effect to appear less often and we need to remap it. We are going to use the usual smoothstep:
Apply a smoothstep to the glitchStrength with 0.3 and 1.0 as the limits:
void main()
{
    // ...
    float glitchStrength = sin(uTime - modelPosition.y);
    glitchStrength = smoothstep(0.3, 1.0, glitchStrength);
    glitchStrength *= 0.25;
    // ...
}
The effect is only applied when the value goes from 0.3 to 1.0 which is a lot less often.
We now need to add more randomness by combining multiple sin() with different frequencies.
First, we are going to put the uTime - modelPosition.y in a glitchTime variable so that we don’t repeat the formula multiple times:
void main()
{
    // ...
    float glitchTime = uTime - modelPosition.y;
    float glitchStrength = sin(glitchTime);

    // ...
}
Now, we are going to combine multiple sin() together with various frequencies:
Add 3 sin() together with random frequencies. 3.45 for the second sin() and 8.76 for the third sin() should look random enough:
void main()
{
    // ...
    float glitchTime = uTime - modelPosition.y;
    float glitchStrength = sin(glitchTime) + sin(glitchTime * 3.45) +  sin(glitchTime * 8.76);

    // ...
}
Finally, divide the combination of sin() by 3.0 so that it still goes from -1.0 to +1.0:
void main()
{
    // ...
    float glitchStrength = sin(glitchTime) + sin(glitchTime * 2.34) +  sin(glitchTime * 5.67);
    glitchStrength /= 3.0;

    // ...
}
And we are done with the glitch effect and the holographic material.
Separating shader chunks 01:18:16
Just like before, we are going to move the random2D function in a separate file and include it.
In src/shaders/, create a includes/ folder.
In that src/shaders/includes/ folder, create a random2D.glsl file and add the random2D function in it:
float random2D(vec2 value)
{
    return fract(sin(dot(value.xy, vec2(12.9898,78.233))) * 43758.5453123);
}
Back in vertex.glsl, instead of the function, use an #include:
// ...

#include ../includes/random2D.glsl

void main()
{
    // ...
}
Make sure everything is saved and the project should work like before.
This is not mandatory, but it’s considered good practice and it makes the functions easily reusable in other shaders.
Going further 01:19:38
As always, feel free to go further.
Here are some ideas:
- Add tweaks to control the animation
- Add tweaks to control the pattern
- Add sounds
- Add scenery like R2D2 displaying the hologram
- Create color variation instead of a uniform color
Anderson Mancini also made a nice holographic material if you want some inspiration